
One big thing to come out of Apple’s WWDC 2017 was the new Core ML framework for iOS. This framework allows developers to put trained machine learning models into their applications and run them on device. This provides two key advantages. The first is that a developer no longer needs to make a call out to some cloud service where a model lives to get their prediction. This improves latency, lowers data sent across the wire, and allows the user to get predictions offline. The other benefit is improved privacy. A user’s data can be kept on device and still get the full benefit of the application without exposing their data. In this post we’ll look at what CoreML is, how to create CoreML models, and how one can use it in their application. This is more aimed at how to use these existing Machine Learning (ML) models in your iOS application and not necessarily how to create your own model from scratch. This does come with some downsides, however. The trained models cannot be updated, so they will not get better, even with new input. The model is embedded on the device, meaning large models will drastically increase an app’s memory footprint. Finally, the data being private on the device means Apple can’t use that data to feed back into their machine learning offerings.
What is Core ML?
To be clear, Core ML does not let you create machine learning models on an iPhone and train them. Instead, Core ML is a framework for importing already trained models in a way that is easily digestible in your application. The models are just dragged and dropped in, and are optimized to be fast, secure, and power efficient. What this means is that you’re essentially getting a finely tuned black box you can send data in and get predicted outputs out. The great thing about Core ML is that when you import a model Xcode does all the heavy lifting for you. It automatically generates Swift classes you can interact with in your code. This makes using your model as easy as: let model = sentiment_model(). We’ll go into a more in-depth example later, but basically Xcode provides you with a programmatic interface to your pre-trained model. A big caveat here is that the interface is only as good as the model you give it. When a Core ML model is created, Xcode creates metadata describing the input/outs and what the model does. If the original creator of the model does not specify the metadata well, there is more work needed to convert the inputs and outputs into the format needed by the model and some knowledge of the inner workings of the model will be needed. We’ll see this process in the next section.
How to Create a Core ML Model
You can create Core ML models using Apple’s coremltools package, which is a python library. You can just feed this package a model created by one of those frameworks and it will create a Core ML model file for use in Xcode. Let’s create our own simple model using Keras with TensorFlow and export it to Core ML. Note: If you don’t care about the nitty-gritty and just want to see it used in iOS, skip to Integrating the Model.
Setup
First, make sure you have Python installed, the code here was tested against Python 2 so download that version. If you don’t, you can get it from here. If for some reason pip is not present in your python installation, or needs to be upgraded, follow the instructions here.
Next, install TensorFlow following the instructions here. The easiest method is to use the native pip version.
Finally, install Keras using the command: pip install keras==1.2.2 Make sure to specify the version, as that is the one compatible with coremltools.
Let’s Make A Model
With everything installed, let’s get to work writing our simple model. A common pattern when working with ML models is that the inputs are numeric. This means we need to convert non-numeric data into numbers via some mapping function and then map the outputs to a specific meaning. We will be creating a model that takes in tokenized strings and returns a positive or negative rating (0 or 1) that will give us some basic sentiment analysis. In our case, let’s create a mapping that assigns specific words we care about to numbers and everything else to 0. For our model, here’s our mapping:
And the corresponding function that uses this mapping to create a tokenized version of a string:
This function takes in a string and splits it into a list of words. It then checks to see if the word exists in our mapping, and if so, it replaces it with that number. If the word does not exist in our mapping, it replaces it with 0. So for the String Wow that was great we would get back [0,0,0,2]. With this information let’s start building our script:
So, what exactly is going on here? Well we’ve defined our mapping, defined a function to do the tokenizing, and created training and test data. In machine learning, training data is used to tell the model that a given input results in a given output. We defined a few sentences to train against as input or X values, with the corresponding sentiment, as 0 or 1, output or Y values. The test data is similar except we use this data to see how well our model is doing. We feed it the Test X values and see if the model correctly predicts what we expected, our test Y values. Our model needs uniform input to process the data correctly. To accomplish this, we do something called padding, which is just adding 0 values, to our inputs to normalize them. We’ve stated that we don’t expect a sentence to exceed 80 words, the maxlen variable, and for every sentence less than that we add 0 values until it contains 80 values. This allows our model to work with uniform inputs. With our data formatted correctly, let’s actually define our model:
We’re not going to go into too much detail about what is actually happening here (if you do want to learn more check out this awesome blog about Recursive Nueral Networks), but this creates a GRU-based recursive Neural Network where our data is fed in two sentences at a time and trained. We then check how well our model performs after the training to see if it’s correctly predicting the results we expect it should. Since we are only training on 8 sentences and testing against 4 our model really isn’t going to be all that good, we’d normally need thousands of data points, but it’ll suffice for our example.
To see what the output of this model is, we can use the model’s predict function and print it out: print(model.predict(sequence.pad_sequences(np.array([[0, 0, 0, 2]]), maxlen=maxlen)))
In this case, we used our example from earlier, [0,0,0,2] or This is great, and fed it into the model. You’ll notice the output looks something like this: [[ 0.65013808]]. This output means that the model is about 65% certain that this sentence is a 1, or has positive sentiment.
Converting the Model
Now that we have our state of the art RNN model, let’s convert it into a format Xcode understands. Using coremltools this process is very simple:
We convert the Keras model from earlier into a Core ML one using the built-in Keras converter and name our inputs and outputs. We then set the metadata Xcode will use to describe our model. The input and output names will be converted to actual property values in the auto generated code in Xcode. Finally, we save the model out and we’re good to go!
Integrating the Model
Putting the model into Xcode
This is the easiest step in the whole post. We just drag and drop our generated .mlmodel file into Xcode 9 and it does the rest. As of the time of this writing, Xcode 9 is still in beta, so it’ll need to be downloaded from developer.apple.com. Once its dropped in, we see something like this when the model is selected:
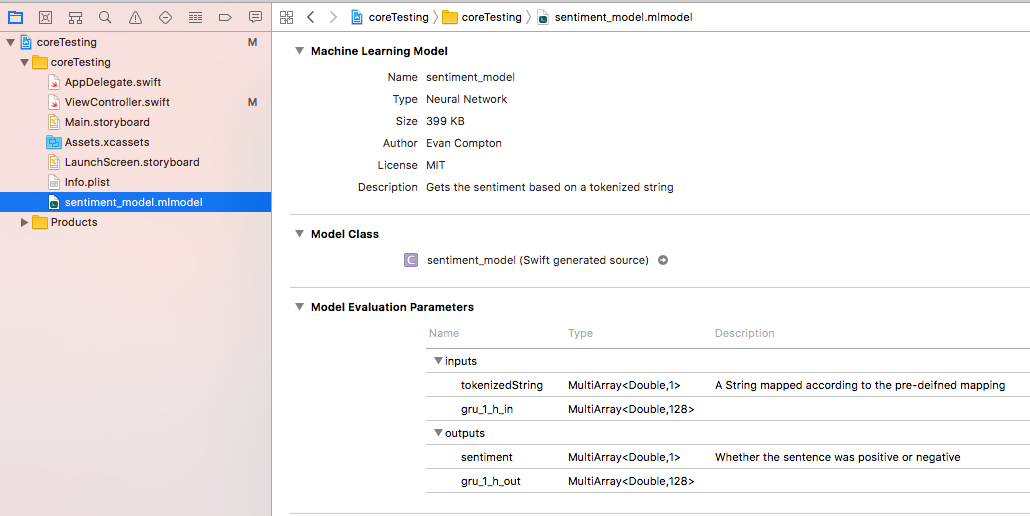
As you can see, all that metadata we specified is now here, as well as a link to the generated Swift code. You’ll also notice there is a mysterious gru_1_h_in input and output there. This is because GRU based Recursive Neural Networks use a hidden state that’s passed between each activation which helps it predict the next output based on previous inputs.
The Model in Action
To keep things simple, we’re just going to have a UIViewController that runs our model on viewDidLoad and prints our output to the terminal. First, let’s bring our mapping from our model into our iOS app since the mapping must be the same in order for our model to understand what it’s getting:
You’ll notice these are Doubles and not Ints. Our converted model is expecting the data values to be Doubles so we need our tokenized strings to be an array of Doubles. Let’s also create some functions to massage our input into what the model is expecting:
Again we have a function that tokenizes our sentences into their numeric representation and then we pad them to be the same input length that is expected. We also convert the Double values to NSNumbers. That is because the new data structure created for CoreML, called MLMultiArray, expects its values to be NSNumbers whose values correspond to the data type the model expects. Let’s setup our data to better illustrate this. The remainder of our code will take place in our UIViewController’s viewDidLoad method:
Here we have the sentences we will be getting the sentiment for, and converting them into arrays to be tokenized. We then import our Core ML model using let model = sentiment_model(). Next, we set up our input structures. For input_data, we create an MLMultiArray for datatype double with the shape (or structure), [80,1,1]. Currently, MLMultiArrays don’t have a ton of documentation, but this might just be because iOS 11 is still in beta. For now, you’ll most likely resort to trial and error to get the correct shape for your model, especially if you don’t know the source code. The gru_1_h_in is easier to create because it maps one to one with the GRU in our model in terms of shape, and if we didn’t know that, the 128 is listed in our model metadata. We set this hidden state to 0 to represent an initial state. Finally, we go through and add the tokenized input of just the first string to our input_data object and create our initial modelInput object. Now we can actually get our model’s results.
We need to wrap our model’s prediction calls in a do/try/catch because it can fail if the input is not formatted correctly. This is useful for debugging when you don’t know the exact input shape. The model’s predict function returns an object representing out outputs that we can get our sentiment property and GRU state from. First, we check the sentiment value to see if it was positive or negative. Again, higher than 50% means it’s likely positive, less than 50% means it’s likely negative. Then we can loop through the rest of our inputs and repeat the process, using the GRU state of the previous activation as the GRU state of the next activation. By then end we should see the following in our console:

Success! We have our model in our code performing predictions.
Conclusion
Core ML is a framework for including pre-trained models into iOS Applications. We’ve seen how to create a model, convert it, and integrate it into our application. Starting from square-one, this is definitely an intensive process. However, once we have the model it is relatively easy to use in our app. This example actually uses a more complex model in terms of crafting the input. Other machine learning frameworks play nicer with the converter and allow us to just send in basic types, like Ints and Doubles, and get out basic types. Until all models get to that level, there is still some work to go before Core ML becomes truly “drag and drop” but for the first iteration it does a fairly good job. The full gist of the Keras model can be found here and is heavily based off the imdb Keras example. The gist of the View Controller code can be found here.
