
The day has come — you’re building a new app in Flutter for the first time.
Your repository is all set up, and you've chosen Flutter as an app development framework because it offers a unique combination of cross-platform capabilities and a custom rendering engine that puts complete UI control in your hands. Unlike traditional frameworks that rely on platform-specific components, Flutter's widget-based architecture and hot reload functionality create an exceptionally fluid development experience.
That has everyone excited. In fact, your large team is chomping at the bit to start creating cool new features. But hold on a second — before you let loose all those great minds, you need to set ground rules on how you’re going to build and contribute to the codebase.
A well-defined development framework does more than standardize your codebase — it creates a shared technical language that enhances team collaboration, accelerates development velocity, and ensures scalability as your project grows. In this guide, I'll explore what’s required to drive successful Flutter implementations, helping you understand what you will build — and how.
To do that, I’ll share my recommendations for these three foundational elements:
- Codebase
- Architecture
- Modules
Let’s get started!
Codebase
The first rule of codebase? This is not just your codebase. Open communication is essential.
Production code is a team sport, usually written with many hands and minds collaborating and building toward a common goal. You will inevitably need to change or rework how things are done, so everyone should feel free to voice their opinions and be heard. Talking through these things as a team and coming to an understanding will help you be flexible and grow safely and consistently.
Code guidelines
Setting clean and consistent standards for the codebase is important. Which Lint rules are important? Where do class variables go? How is the directory organized? These are all great questions you should be asking the team. And once you all have come up with answers …
WRITE THEM DOWN.
Create a reference and put it somewhere that’s easy for everyone to find — not just for the team you have now, but for any new team members that come aboard. (The repository's README file is a great place to start.) Having your code guidelines documented allows anyone to reference them while they are working, reviewing code, and even testing. Setting expectations for test coverage and organization is just as important as the rest of your processes.
Architecture
Selecting the right architecture for your Flutter project is an important decision that lays the foundation for your app's quality, reliability, and long-term maintainability. There are lots of different proven architectures, and if your team is dedicated enough, there are no wrong choices.
In most cases with Flutter, I lean towards Model-View-ViewModel (MVVM) based in Clean Architecture. It balances the separation of concerns while reducing the amount of complexity that can come with other architectures. If you are dead set on using something else (or just think I’m plain wrong), go for it — just be sure to talk it through with your team, making sure they understand what the business needs are and how you all plan to build it.
Collaboration tip: Document your decision in your code guidelines and point to a real example of how you use it.
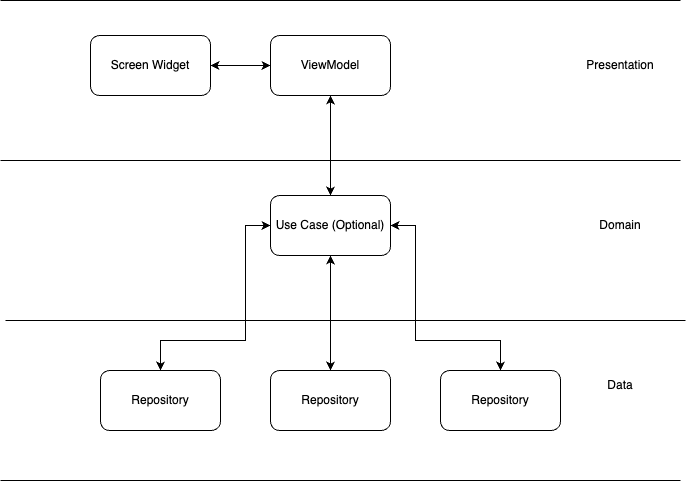
The building blocks of MVVM architecture
Every application is a unique ecosystem of features, and each feature is comprised of interactive screens that achieve specific user goals. A great starting point for building your architecture is by breaking each screen into parts that work together for a common functional goal.
Each screen should have these essential parts:
- Screen Widget Tree (UI)
- ViewModel (Business logic for the UI)
- UseCase (Optional)
- Repositories (Intermediary between the ViewModel/UseCase and a data source)
Screen widget
The screen widget displays information to the user and manages user interaction. Each screen should be a root widget and can have any combination of child widgets. To keep your widgets as lean as possible, they should be free of business logic and driven by a state object. This state object should make it easy for the consuming widget to use deterministically. This allows you to leverage Flutter’s widget testing for verification more effectively.
ViewModel
The ViewModel coordinates with the Repositories and/or UseCases to provide the screen widget with the data it needs. The data exposed to the screen widget should be everything it needs to display information to the user — no more, no less.
The ViewModel also exposes methods to the screen that allow the widget to react to user interaction, such as button clicks or changes in device state. The screen widget will notify the ViewModel of any changes, and the ViewModel will expose a new state if needed. Don’t worry — I will explain more about state management soon.
UseCase
The UseCase encapsulates your app's business logic and facilitates a connection between the ViewModel and other repositories. For instance, if you’re building a login screen, the UseCase could prevalidate the username and password before it is sent to the backend via some repository, allowing you to quickly test your business logic in isolation.
Another benefit of using a UseCase is to reuse the business logic in other places in the app. Common functionality, such as user logout processes or profile information updates, can be standardized and shared through dedicated UseCases, ensuring consistent behavior throughout the application.
While UseCases are useful architectural components, they aren't always necessary. For simple screens that only require basic API calls without complex business logic, implementing a UseCase layer may be unnecessary. The decision to implement a UseCase should be based on the complexity of the feature and your team's architectural preferences.
Repositories
Repositories serve as interfaces to external dependencies, including SDKs, APIs, or device services such as databases or notifications. Each repository should have one job and be free of any business logic that belongs in the UseCases or ViewModels.
Below is a diagram to help visualize the structure of a proposed architecture:
State management
State management is the systematic approach to handling, maintaining, and updating data that can change during an application's lifecycle. It encompasses how data flows through an application, how that data triggers UI updates, and how user interactions lead to state changes.
Choosing a state management in the Flutter ecosystem can be tough. There are many choices, vocal supporters for each one, and just like in choosing the architecture, there’s no wrong choice.
Collaboration tip: The most important thing is to define in the code guidelines how and where it will be used.
If you don’t know where to start, here are my recommendations:
ChangeNotifier
If you aren’t dead set on a specific state management library, ChangeNotifier allows your ViewModel to expose your state in a straightforward way with the flexibility to configure it as you see fit. Your ViewModel should own the state and be exposed as a ChangeNotifier, allowing your screen widget to react to state changes.
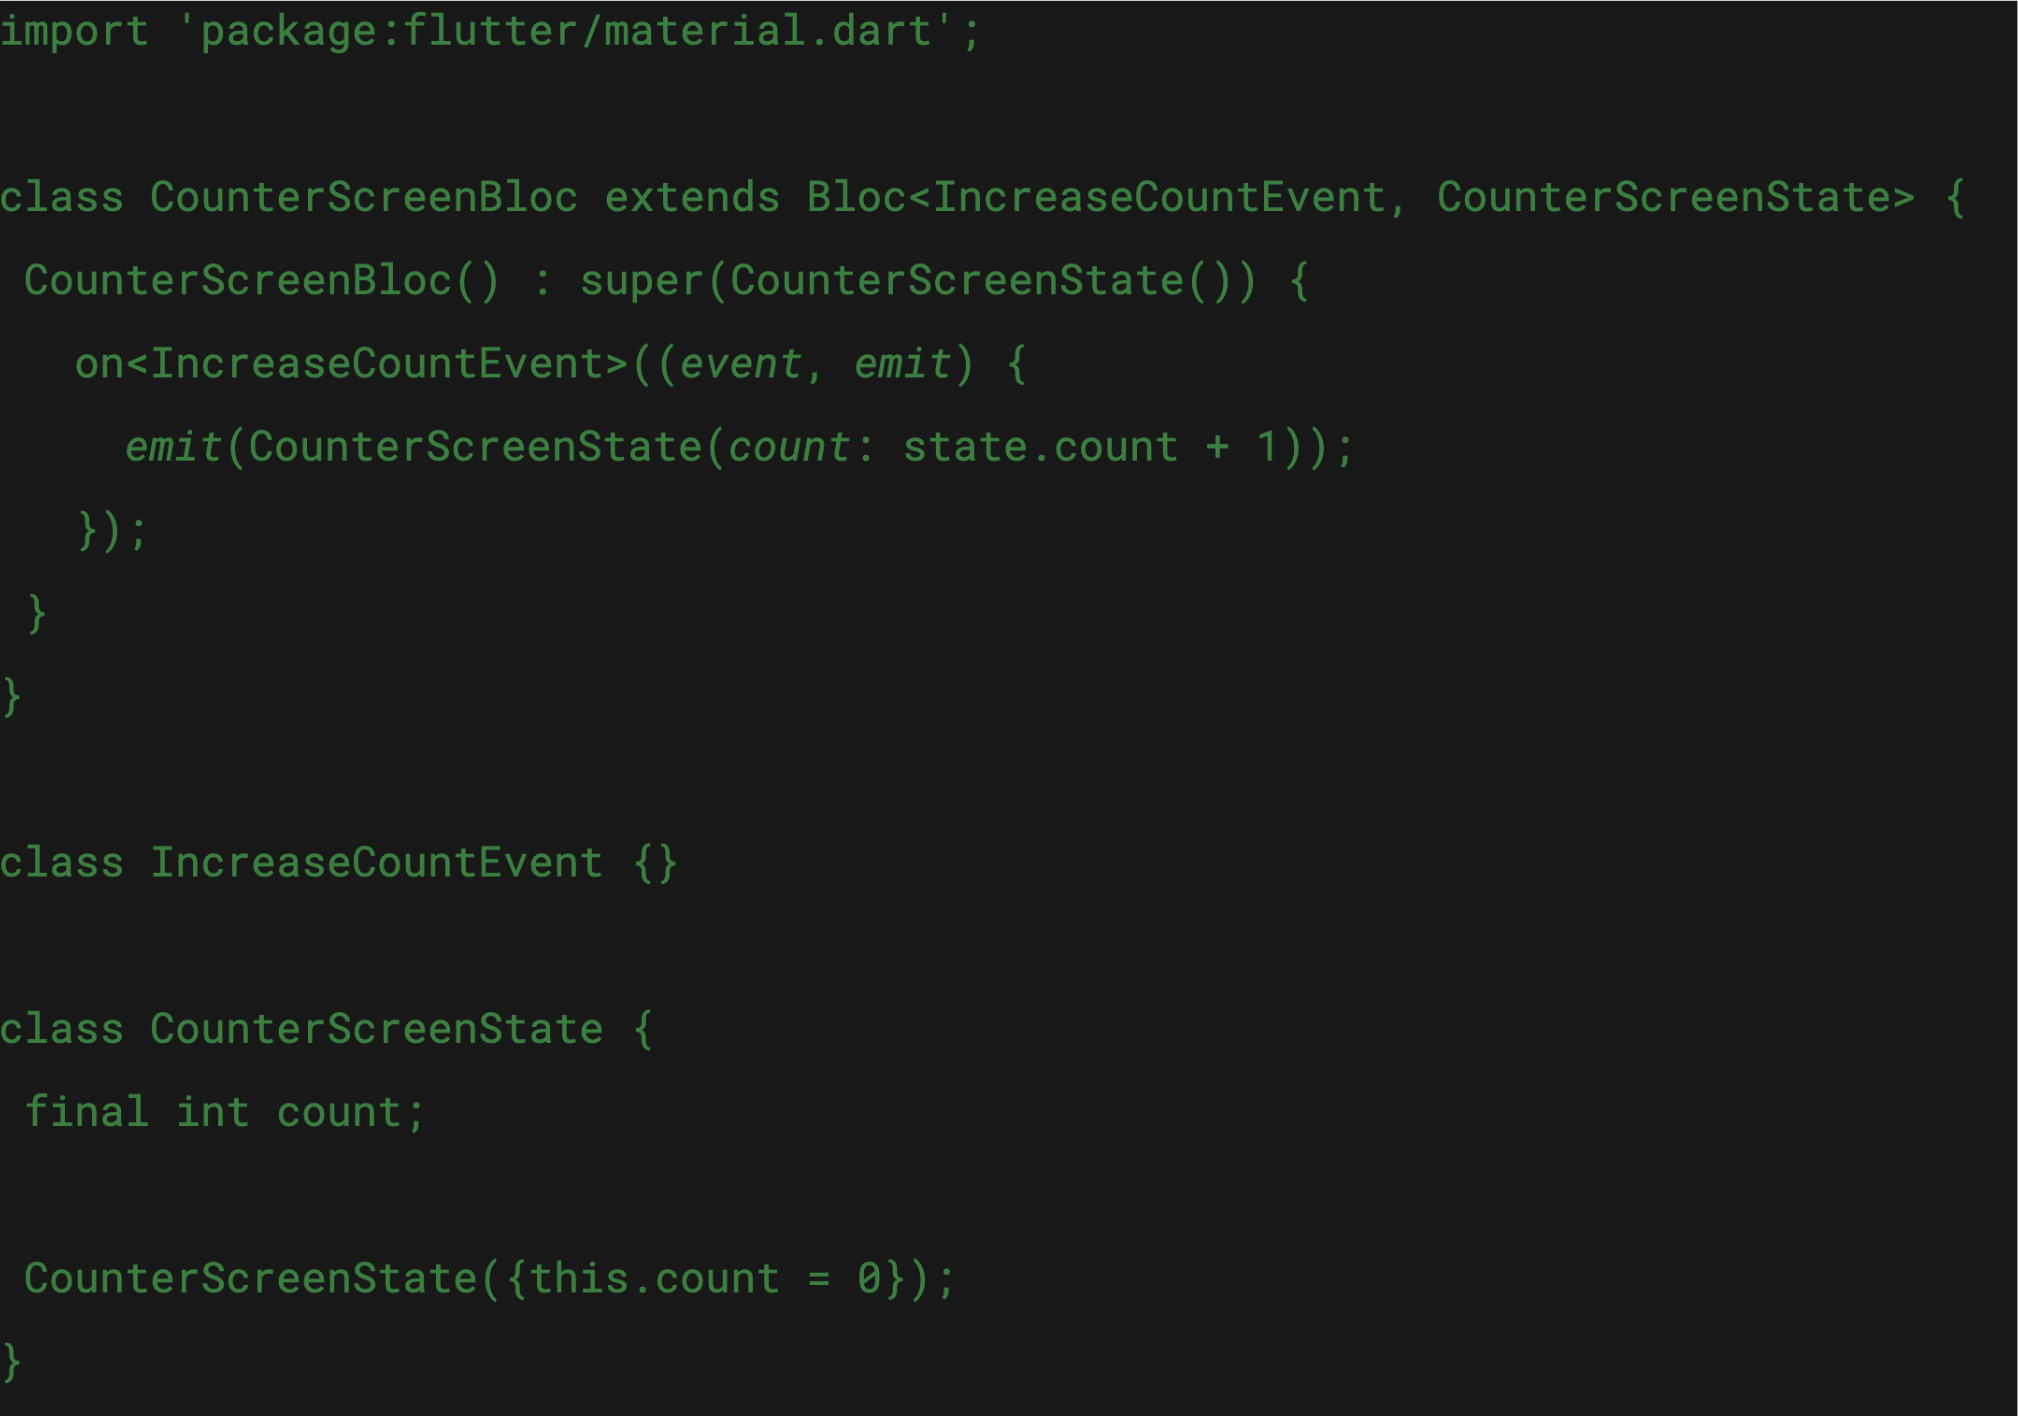
Business Logic Component (BLoC)
BLoC is a comprehensive state management library that can replace traditional ViewModels in your architecture. While powerful and predictable, BLoC implementation requires substantial boilerplate code and introduces additional complexity in event tracking and propagation. It also relies on its own testing framework, which may impact your existing testing strategies. Adding more steps to your development flow requires more vigilance and care. BLoC is not a bad solution to state management, but make sure your team is on board and clear on how it will be used.
Below is an example of what BloC would look like:
And here is how you interact with the BloC in a screen widget:
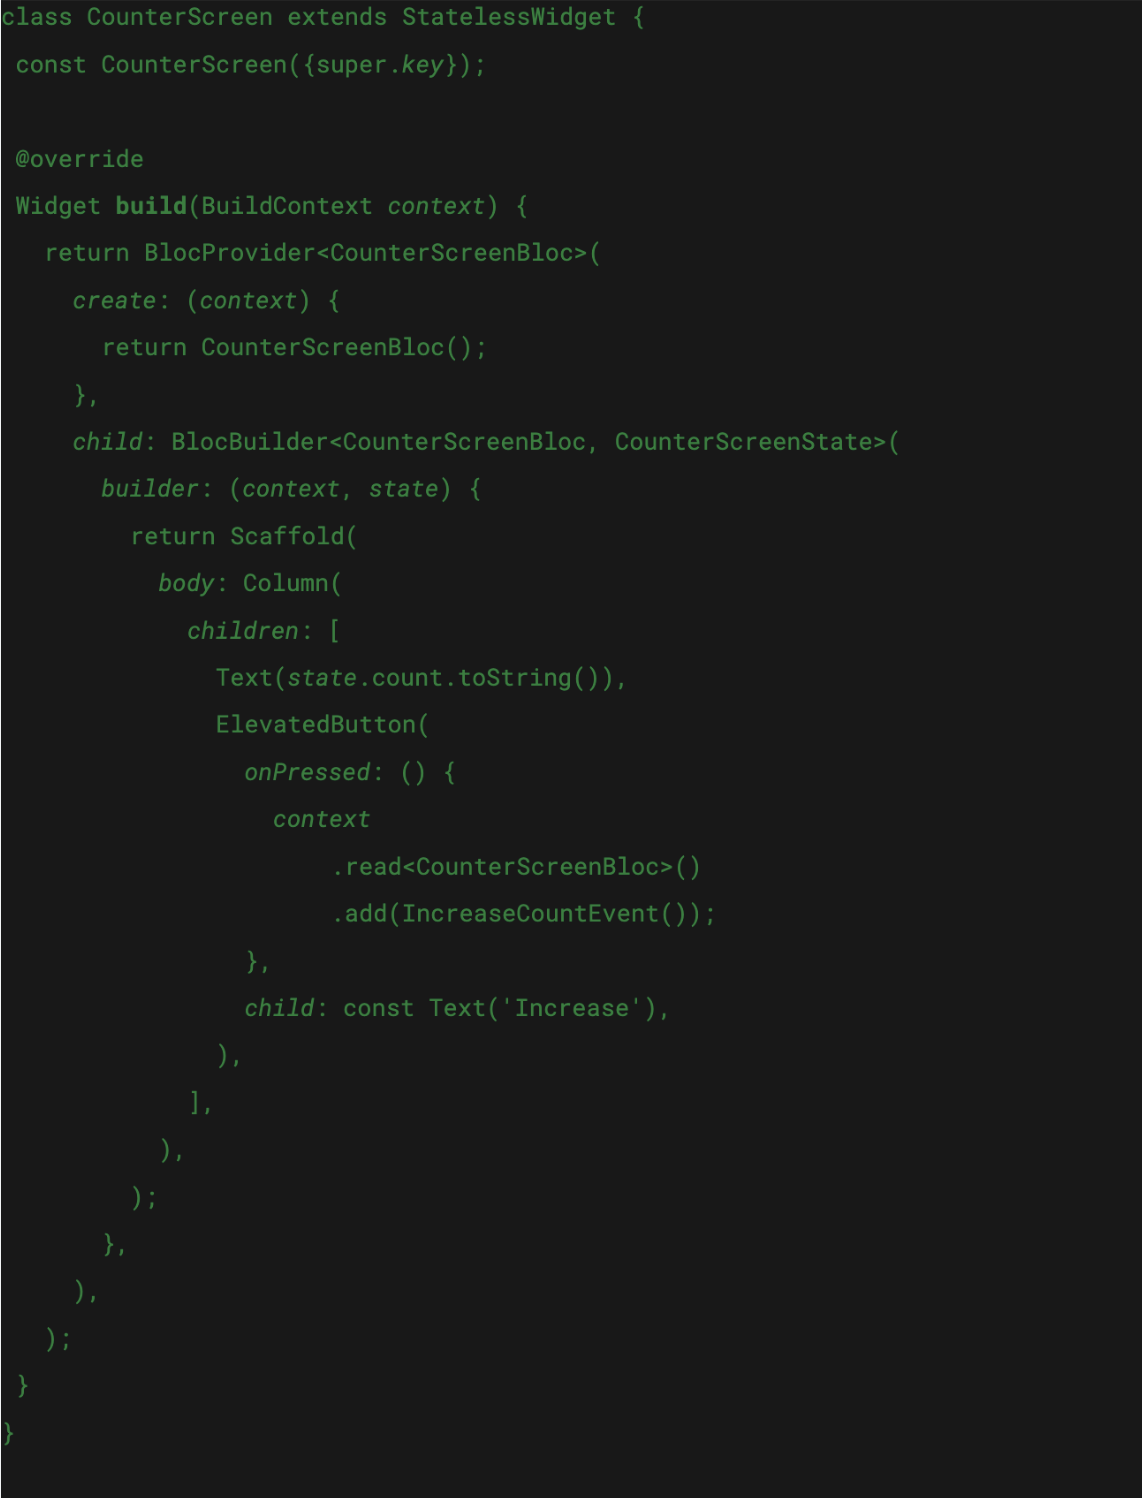
Since the BloC takes the place of your ViewModel, connecting the BloC to the widget is more or less the same when using a ChangeNotifier.
Modules
Modules provide a powerful approach to code organization by encapsulating complete features as independent units. They have their own dependencies and are pulled into your project just like any other dependency. By exposing only interfaces, modules isolate internal logic, making changes easier to manage and reducing the impact on the rest of the codebase.
Collaboration tip: Module implementation requires strategic consideration. Teams should establish clear criteria for their creation, ensuring alignment on which features warrant modularization. While modules promote better code organization, they can significantly affect compilation times — making it crucial to balance architectural benefits against performance implications.
The trick to working with large teams
Multiple squads all working on the same codebase in a small space can be a recipe for pain. Modules can help reduce that pain by allowing squads to be strategic in working on specific feature sets. Features can be divided up by squad to reduce the impact of changes app-wide.
However, keep in mind that those features need to be substantial. Making a super-small feature a module just to parallelize work is not a reliable solution. On the other hand, if there is an authentication module that has a large surface area for work, then that might be a better fit.
As always, talk with your team and don’t be shy about saying when the juice isn’t worth the squeeze.
Plans for externalization
If there is a request to build out a feature that other teams will use in the future, this is a great opportunity to think about modularization. Since a module is a local library, it should be pretty straightforward to externalize it when the time comes.
Laying the groundwork
If you aren’t modularizing a feature, that shouldn’t stop you from future-proofing it. When developing new features, dedicate a lot of thought to how each feature will be used throughout the app. Try and reduce the number of interaction points your application needs for those features. That way, if you do decide to modularize any feature in the future, you’ll have less work to do.
What Now? Build, Adapt, Repeat!
Great projects aren't built in isolation — they're shaped by collaborative minds and continuous dialogue. Your journey in Flutter development begins with the foundation I've shared here: a structured approach to codebase management, thoughtful architecture decisions, and strategic modularization. These elements create more than just code — they establish a shared technical language that allows your team to build, innovate, and scale effectively.
As you begin, remember that flexibility is one of Flutter's greatest strengths. The guidelines presented here aren't rigid rules. When you encounter challenges, return to these principles, engage in team discussions, and adapt your approach accordingly. Your team's collective expertise will help you create not just functional apps, but exceptional Flutter experiences that stand the test of time.
